In this fast paced world there is one sad,but very true fact, and that is many people won’t go the extra mile in their business… or they are spread so thin they simply can’t. But those few that are successful and stick out above the rest make the extra effort with their service and customers. Have you experienced either side of this coin as a customer? How did each experience feel?
The fact that so many businesses don’t put in the extra effort for their clients and customers is a HUGE advantage that you can use to really stand out!
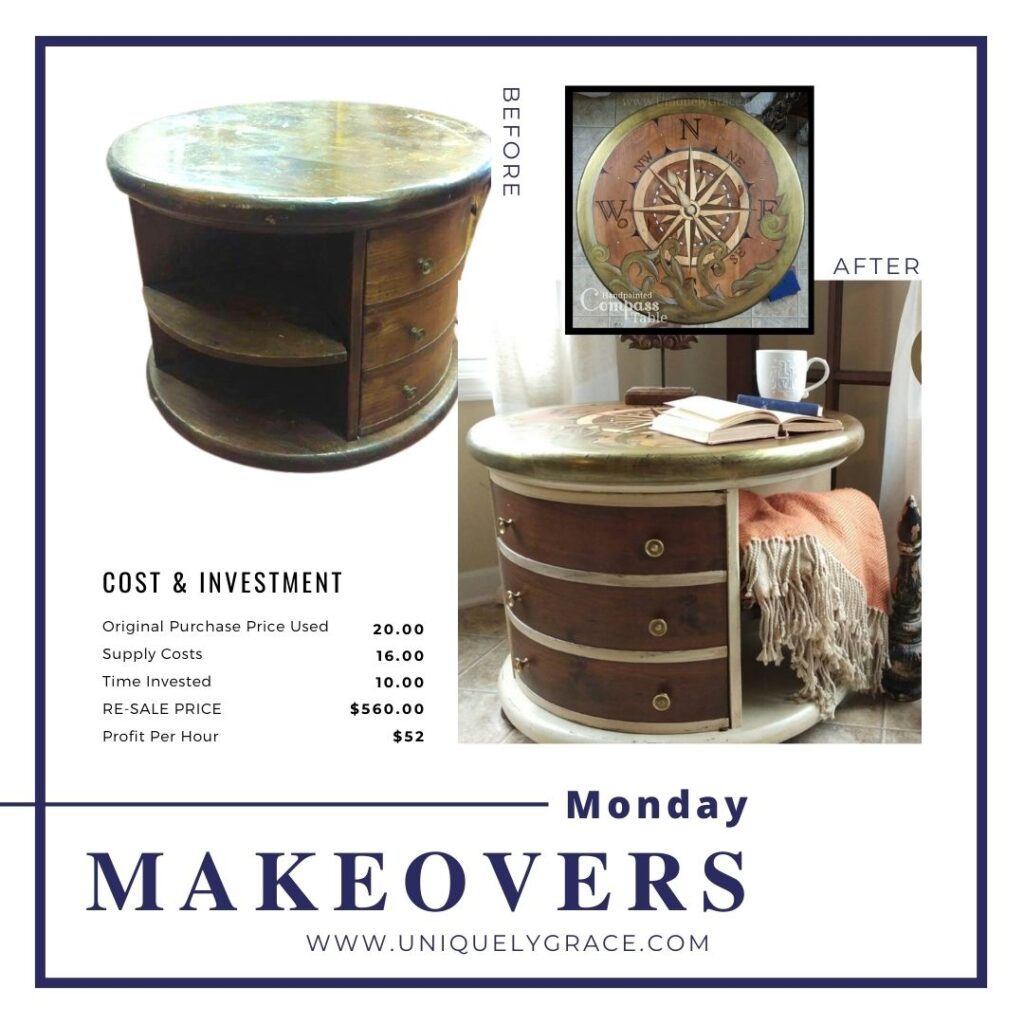
Tip #1 - Quality Finishes & Design
I have to be very careful here. This is my jam, I love this topic and though I could write all day about it, alas, that is not what this blog post is about entirely. This is the foundational step for getting ahead of the competition. DO NOT skip this step. LOL!
So here is a brief synopsis of what you can do to make sure you are providing a signature quality finish, high end design that yields a discerning customer and price point.
There are 4 layers to unpack for this to happen.
- Good Bones – Pick a piece of furniture with good bones, meaning low structural issues requiring only minor repairs. This step should not become the focus of your project.
- Proper Prep Work – Chalk paint doesn’t need prep work. YES, I KNOW… LOL! But the piece needs cleaning to remove wax residue and the chipping sealer needs sanding down and the hardware needs to be polished… there is always some prep work, even on the best furniture pieces.
- Quality Products – If you are running your sales in a “Walmart” fashion, where the lowest product on the market place is the winner… then I can see why you may skimp on this… I certainly fell into this trap. Whatever your production costs are those costs are absorbed and passed on to the customer through your pricing. THIS IS OKAY, it is how every successful business runs! So why not create the best product you can?
- Intentional Design – Okay, so this step takes a little more effort than you might be taking right now. A quick internet search can show you the difference in refurbishers that prioritize this step and have higher quality products.
This is a new concept to many, and I have an entire course on this one bullet point, but one big take away right now is “BE INTENTIONAL with your DESIGN”. Think it out, write it down, bounce it off of some peers if you need too. Whatever you need to do to be confident with your colors, techniques and hardware selections, do it and your piece will become a scrollstopper.
The extra money and time you invest (notice I didn’t say spend) in good bones, attentive prep work, great design, and quality paints and sealers can lead to yielding 3-6 times your current profits if you are making around $15 an hour or “minimum wage”. Meaning would you like a raise? How does $50+ an hour sound?
I have a fantastic FREE training tool for you that teaches a lot of this, called the “5 Furniture Refinishing Myths that Cost You Money” It’s free, so take a look… It’s a combination of many years of sweat, blood, tears, and research and, man, I wish I had all this info in one place when I started refinishing in 2015.
Tip #2 - Create a Gallery Page or Portfolio
With the pandemic now being a normal part of our lives, most of my personal interactions with clients and customers are virtual. That being said, if you still prefer to meet with a client in person you will need a physical portfolio to show your work.
Most furniture refinishers don’t have this. They just randomly toss images at their customers in a chat from what they currently have on their phones or computers, or they may toss their Instagram link to the customer to filter through all the posts to find the finished pieces.
Showing up with a portfolio or having a professional looking online gallery that you can share a link to will set you apart from other refinishers. Here are three ways you can create a gallery online…
- If you have a website add a page for your Gallery you can share.
- No website, no problem! Did you know you can just host a single landing page? Create a landing page with a gallery of before and after photos and maybe some customer testimonials, this will go a long way.
- This is not my favorite option but it gets the job done and it is free. On your Facebook Business page create an “album” of pics of just the finished pieces or with nicely put together “before and after” shots in one image. Pick one or the other as it will look more consistent and professional.
PRO TIP: Use www.canva.com or a collage app to create your “before and after” images. If you have a logo, use it!
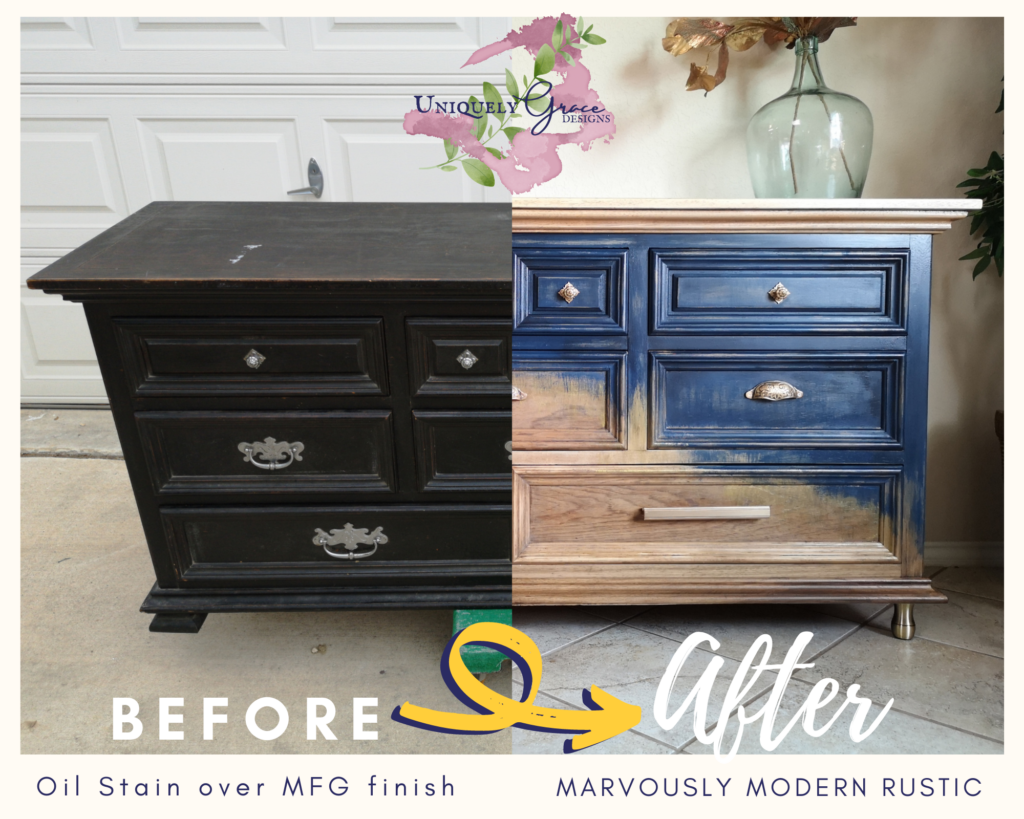
These tools and details are not hard to learn, but if you are short on time or not very tech savvy you can always hire someone to do this work through sites like www.fiverr.com or www.upwork.com. I would suggest creating a template for the “before and after” shots and that way you can just drag and drop your images as you finish new pieces.
This will begin to set you apart from other refinishers you are competing against when looking to land custom clients. It shows you are serious about what you do and will care for their piece as much as you have these other pieces you have lovingly displayed on your page or in your printed portfolio.
Tip #3 - Thoughtfully Stage and Photograph Your Pieces!
Okay, Okay… you may already stage and photograph your pieces, but are you going the extra mile with it? Not only are you staging to sell but you are staging for images that will be your marketing tools. Images used for your social media, your blog, if you have one and your portfolio.
I am not going to get into staging details here but I do have some quick tips.
- A Blank Wall– begin with a blank wall. It can be outside or even the garage door but for heaven’s sake sweep the area first and make it look classy not trashy. Think of creating a catalog for your business. Things need to look clean, beautiful and the customer needs to be able to visualize the piece in their own place.
So find your “wall” but it doesn’t have to be an actual wall. A backdrop with some tall photography stands to clip it on will work in the middle of a room or even outside (watch for wind). You don’t want any other furniture around in the shot frame. This makes it look like a used piece not a refurbished piece.
- Thrift “Pretty Décor” – If you don’t have “in style” décor (look at Pinterest for ideas) in your home then check out thrift stores for great prices and deals. Think outside the box… maybe paint a vase so it is a more stylish color or fill a glass one with diamond shaped rocks for some bling. The more luxurious you get here, the more money you can ask for the sale. Other stores to check: The Dollar Stores, TJ Max or Marshall’s, Big lots.
Only pick 3 items for the top and 1 or 3 items for the floor. Keep it simple and don’t over decorate. This will make it hard for the customer to visualize their own décor. You just want simple pieces that compliment the furniture and give them an idea of design possibilities.
- Lighting! – This is a must have! Outdoor or indoor photos that rely on natural lighting (though some of the best lighting for your shots) limits your time window that you can shoot your pictures. Maybe, it’s cloudy and rainy all week. A cheap set of filtered (soft) photography lights can really keep you from having to wait for good weather or a specific time for the sun to come in through the window.
I use my lighting kit in my living room, even with the natural glow I get from the picture window, to soften the shadows and help create even, bright lighting over the entire piece. I got my box lighting set of 2 on Amazon over 6 years ago, we have moved twice and I use them all the time and I have had to replace the bulbs only once. - Multiple Angles and Detail Shots – It is important to photograph the entirety of your piece from all angles. Take pictures of the front, sides, top, and close up details of selling points, like dovetail drawers, special hardware, or veneer or hand carved detailing. Watch for shadows!
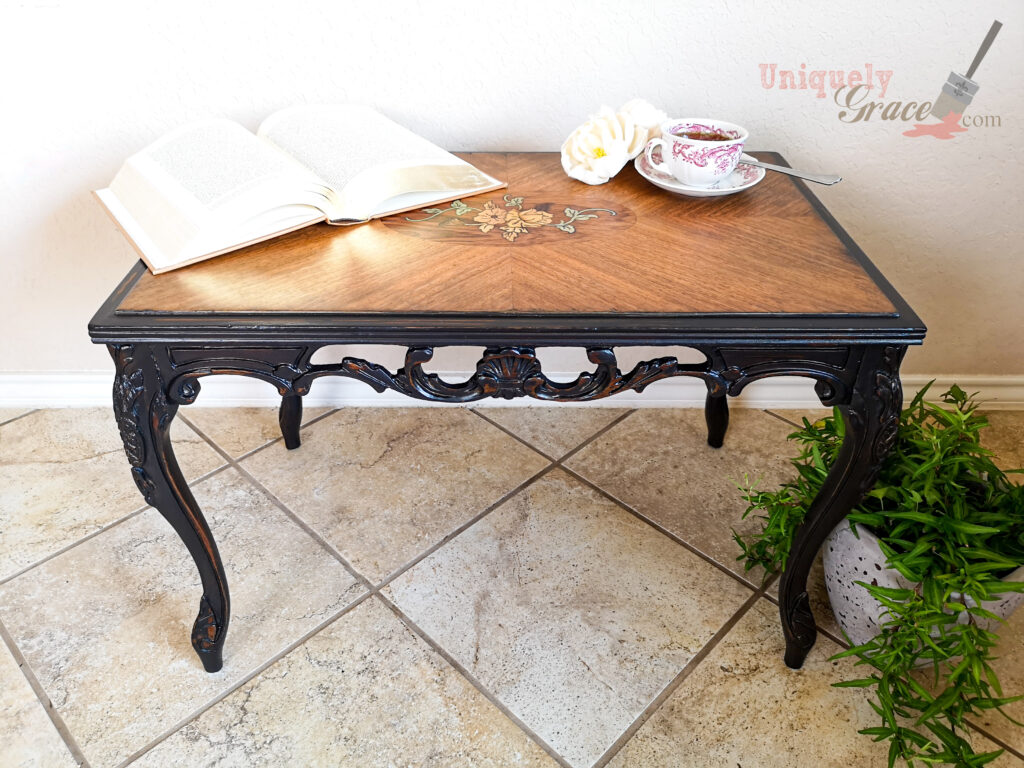
The 3 goals with Staging is to give the customer a clear message as to what is for sale. This is why it should be the only piece of furniture in the shot. Keeping the decor pieces limited gives the customer a basic design idea of what they can do with it, without making it personal or distracting from the piece itself. Last but not least, good lighting let’s them see the true color, details in the design and yes, even the flaws if there are any you could not fix. This is why lighting and taking pictures from multiple angles is so important.
Check out the Podcast/Vlog about staging, lighting and photography!
So remember:
Give it room to shine!
Dress it for success!
Light it like it’s showroom worthy!
Tip #4 - Refinishing to Sell? Do Your Market Research!
To get another edge up on your competition you need to do some local market or national market research (if you sell online and ship). Market research is gathering of data for consumer preferences. This is something that must be done no less than twice a year. With the advent of the internet, Pinterest and Instagram, trends in design styles and colors are changing faster than they ever have before.
Why should you do your Local Market Research? Check out this video for more details on this topic:
In my “Designer DIY Framework Masterclass” I include a bonus section that helps you learn how to conduct local market research right from your own home, in your PJs and without having to cold call or random message potential customers. How cool is that? You could even be drinking your favorite cup of joe or wine if you wish. LOL!
This information has been so popular I have actually separated it out from the Masterclass and I am now offering it on it’s own quicker course. “Leveraging Facebook Marketplace for Market Research”
This data will give you insights into what your local market customers want, so you can dial into what will sell and because you are awesome, and reading this, you have the desire to improve. You will be able to take this data and create it in a more unique and quality finish than your competitors. Which brings me to the next tip…
Tip #5 - Be in a Pricing Bracket of Your Own
Okay, hear me out on this one…Trust me it works. I have been selling since 2015 and the pieces I did this with usually sold within a week, and for asking price.
You landed your last client with your portfolio/gallery. Now you have time to flip a piece to sell and you have done your market research. You now have worked hard to create a quality looking refinished piece of furniture that needs a new home . You have taken time to thoughtfully stage and photograph it from multiple angles. You are about to announce it to the world and you look at the competition’s prices and you….
(long pause for you to think of your gut pricing reaction after seeing that beautiful dresser you refinished, now has a competitor listed on the marketplace at $150)
Are you…
A. Crushed because you were hoping you could price it for at least $250, but now how could you possibly sell it for $250 when there is one similar for $150.
B. Saddened because now you must wait until their piece sells before you post yours, hoping it won’t take more than a week?
C. Look closely at the photos, make sure you have a superior finish, staging, photography and now confidently price it for what it and your work it’s worth? $500!
If you said “C” you are correct! There is value in pricing, confidence, quality, cleanliness, design and photography. The customer who spends more, usually raves more. The one who spends less raves less and complains more. This happens in every industry. Which customer would you want?
Story time: There was a blind test test for three wines, each bottle was marked with a price. One was cheap, one was fairly priced and one was expensive. The testers tasted all three wines and ranked them by taste in the same order of the prices, the expensive one being the best and the cheapest one being the worst. Then it was revealed that all the wines were actually the same exact wine. The perception of quality was given by the fake price on the bottle.
The next piece to this pricing puzzle is customer service and satisfaction. What can you do to set yourself above the rest so your customer is singing your praises from the virtual roof tops? What obstacles can you eliminate for them for the extra mile in customer service?
- Can you Deliver for FREE within a certain mile radius?
- Can you pleasantly package a touch-up kit?
- Can you offer a guarantee on your work?
Imagine if your customer received all these and/or any other creative “bonuses” you can offer for better customer service (remember if you include anything like a touch up kit you need to calculate that cost into your price). Imagine how they would feel? How would they review you? Are you standing out above your competition in a class all by yourself?
PODCAST/VLOG – Video coming soon
Which brings me to the next Tip…,
Tip #6 - The Follow Up
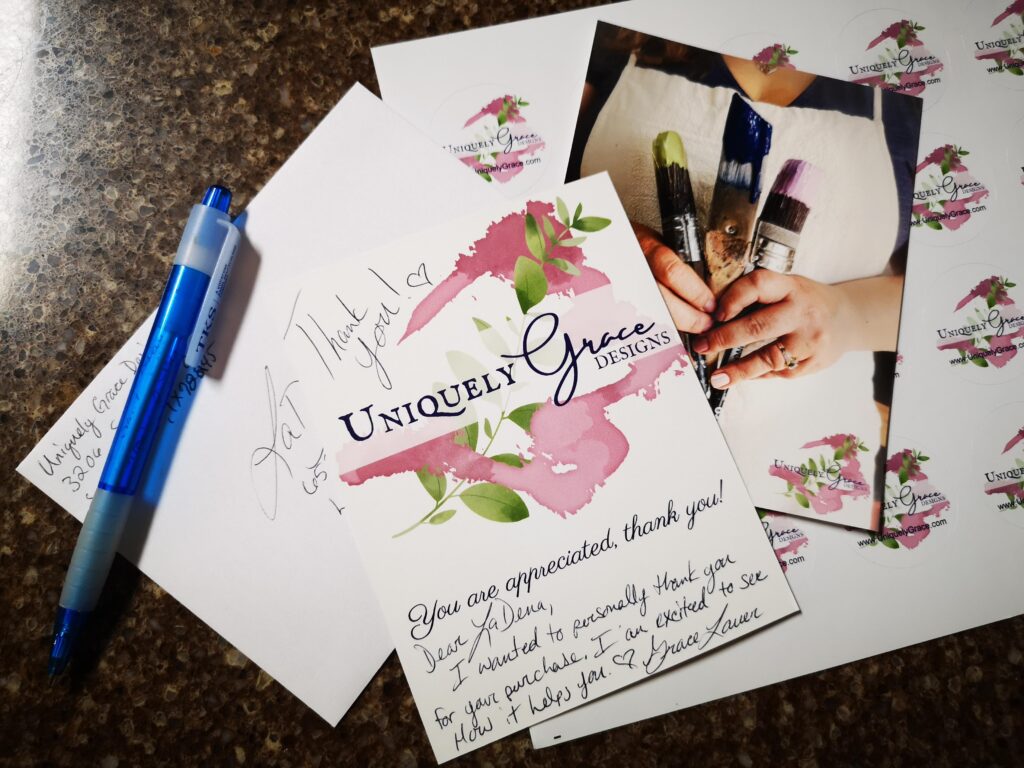
As a “buyer” in this day and age I want you to think about the last time anyone sent you a hand written thank you note? Did Walmart do that last week when you dropped $300 for food and necessities? Did the person you purchased the last piece of used furniture to flip from send you a thank you message? How about an Esty seller? Did they include one in your package? This last one has happened to me and you better believe I raved in my review on Etsy that I left for them.
Checking in on your customers is a huge way to get ahead of your competition. It is the final piece to making this transaction an “experience” instead of just a “purchase”, and that my friend is how you get ahead of the competition.
Key Takeaway: I can’t say it better myself so I am going to give you a quote:
“(If) all you had was one guaranteed customer who was going to buy the product, and the only way for your business to grow was for that person to tell someone else about the product. What would you have to do to make that happen? You get one purchase, and you have to deliver such an experience, that one purchase is what kicks off your business.” – Alex Harmozi (author and multi-million dollar business coach, Google him!)
What would you do for that one customer, to make that one purchase an unforgettable “experience”? What is your extra mile? Leave your idea in the comments below, helping each other will help everyone!
PODCAST/VLOG – Video coming soon
Was this post helpful? Did you like it or want more info on any of these steps? Help me create more content that is great for you… Leave a comment below and let me know.